
Instruction
Manual for VocaLog
2™ Vocal Activity Monitor
Introduction
Getting
Started
Installation
Hardware
Overview
Software
Overview
Main Menu
Add
New Patient
Connect to Monitor
Tab
Calibration
Wizard
Ambient
Noise Compensation
Manage Patients Tab
Receive
Data Tab
Remote Connect
Tab
Analyze
Vocal Data Tab
Change
Settings Tab
Workflow:
Preparation for a New Patient
Working With a Returning Patient
Adjusting
Patient Settings
Creating and
Editing Custom Patient Reports
Viewing
and Saving Patient Reports
Definitions
FAQ
Computer
System Requirements
Technical
Support
Rainbow
Passage
Introduction
to the VocaLog 2™ Vocal Activity Monitor
The
VocaLog
2™ Vocal Activity Monitor provides a system for objectively evaluating
and treating
Sound Pressure Level (SPL, measured in dBC)
in voice
patients. The
VocaLog 2™ system consists
of the VocaLog 2™ Activity Monitor worn by the patient to monitor and
record vocal
activity, the PC software, and a Calibration Microphone. Using the VocaLog2 Desktop
Application on
your PC, the clinician can download the data recorded by the Monitor. Together, they provide a
means to monitor
your patients’ vocal activity for direct interpretation by the
clinician and
feedback to the patient on established treatment goals.
The
VocaLog2 Desktop Application software allows you to interpret the data
collected by the VocaLog Vocal Activity Monitor.
Using the VocaLog 2™ System, you can
initialize and calibrate the Vocal Activity Monitor, connect remotely
to
monitor and receive data for analysis within the VocaLog Desktop
Application
Software, and monitor daily patterns in your patient’s vocal activity
to
determine when the patient’s volume is outside the range of established
loudness levels.
Notice:
The VocaLog 2™ system does not record voice, sounds, or speech. It does
not
recognize speech. It only logs Sound Pressure Levels using the dBC scale.
Getting
Started:
Installing
the
VocaLog 2™ System
The
VocaLog
2™ Desktop
Application must be installed on a Windows® PC prior to
operating the VocaLog 2™.
Begin
the Installation
Insert
the VocaLog 2™
Installation USB drive into the computer. Installation should start
automatically.
If nothing is displayed after a few seconds, browse the USB drive, and
double-click
setup.exe.
Set-Up
Wizard
Follow
the on-screen instructions as prompted by the Set-Up
Wizard which will guide you through
the steps necessary to install the
VocaLog 2™ Desktop Application. The software installation takes
approximately
five minutes. Once installed, the Desktop Application will start
automatically.
(The application is also available on the Start Menu, under All
Programs -> Griffin Laboratories -> VocaLog 2™ Vocal
Activity Monitor).
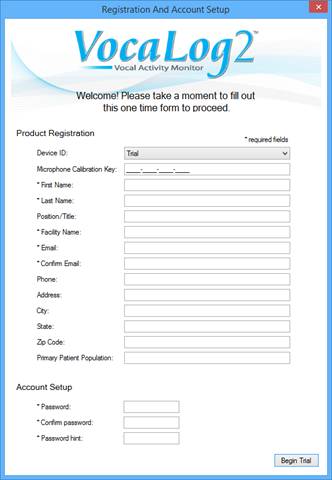
Fill
in the required fields
on the Registration and Account Setup page in order to complete the
system installation.
The
password will be used
for locking and unlocking your screen for privacy with patient's
present so it
can be as short as 2 characters.
Driver
Installation
During
the installation
process, you will be prompted to install the VocaLog 2™ Monitor drivers. These drivers must be
installed before
connecting the VocaLog 2™ Monitor to the USB port in order for the
VocaLog 2™
Monitor to communicate with the VocaLog 2™ Desktop Application.
Note:
When
installing the drivers, a warning message may
appear indicating the drivers are not digitally signed.
If this occurs, click Continue. The drivers can
also be installed through the menu File
> Advanced Options > Drivers > Install Drivers
If
the drivers do not
install automatically (often due to a 64 bit operating system) follow
the steps
below:
1.
Open your Device
Manager in Windows
2.
Locate the VocaLog 2™
Docking Station in the list
3.
Right Click and select Update
Driver Software
4.
Select Browse
my Computer3
5.
Browse for the
VocaLog(R) Software Installation USB and select Docking Station Drivers
6.
Click OK
and installation will automatically install drivers.
Notes
about Installation:
The
.NET Framework 2.0 is
required for installation of the VocaLog 2™ Desktop Application. Setup will automatically detect
this
and install if it necessary. This
may
add a few minutes to the installation time.
Uninstalling
the VocaLog 2™
Desktop Application
To
Uninstall the Desktop
Application:
·
Windows
XP and earlier: From
the Start
menu, open Control
Panel, choose Add or Remove Programs,
locate the VocaLog 2™ Vocal
Activity Monitor, and click Remove
to uninstall the program.
·
Windows
VocaLog
2™ Hardware Overview
The VocaLog 2™ Vocal
Activity
Monitor
hardware consists of a neckband
“monitor” and a USB microphone used during calibration. The following
section
will outline the various features of the hardware.
MONITOR
In-Ear
Auditory Alerts:
OPTIONAL
FEATURE: Not
included on all units. To use, insert the ear piece over the prong
located on
the VocaLog2 neck band. When auditory
alert mode is enabled, the
VocaLog 2™ Unit will emit an audible signal any time undesired vocal
activity
is detected. To
adjust volume simply
press the V+ button to increase
volume, and the V- button to
decrease volume.
Vibrotactile
Alerts:
The
VocaLog 2™ Unit has the
ability to vibrate when undesired vocal activity is detected (either
too soft
or too loud). Slide
the switch labeled VIBE on the neck
band to the vibe
position to enable the vibratory mode.
This
feature can be disabled during the calibration routine.
R
Standby
Mode:
Slide
the switch to the SLEEP mode when
the VocaLog 2™ unit is
not in use to preserve battery life.
This
is also recommended when the patient is not wearing the monitor, to
avoid
picking up noise.
The
VocaLog 2™ Laryngeal
Sensor
The
Laryngeal Sensor on the
VocaLog neck band unit detects the patients’ vocal activity and
transmits the
data to be stored. Proper and consistent placement is essential for
accurate
calibration and monitoring. The sensor should be located just above the
sternal
notch, and must be flush against the skin with enough pressure to
ensure
constant contact. To assess proper fit, direct the patient to move
their head
side to side and up and down several times.
The sensor may self-align with initial movements, and
should not move
once properly positioned.
Size
Selection:
Sizes
are based on neck
size, in centimeters. Use the included flexible ruler, and not shirt
size. In
general, most women will use a size 28, and most men will use a size
35.
Size
28, for neck sizes 28
to 35cm
Size
35, for neck sizes 35
to 42.5cm
Size
43, for neck sizes
42.5 to 50cm
The
unit must be adjusted prior to
calibration, and must be recalibrated after adjustment.
Length: There
is about 2cm (.8") of adjustment in
each size. The correct size must be ordered. The neck band may be slid
into or
pulled out of the main housing to lengthen or shorten the neckband. Do
not
force it. Adjust for comfort; the main housing should wrap around the
neck more
than 180 degrees so it does not shake off easily.
Curve:
The
VocaLog 2™ Laryngeal Sensor has a durable wire frame which can
be bent and adjusted for proper fit. It
is recommended that slight adjustments be made,
and test for fit between each adjustment.
To
tighten:
Cross the two ends over each other until the desired fit is
achieved.
To
loosen:
gently pull the two ends away from each other until desired fit
is achieved.
WARNING:
A loose fit may cause loss of accuracy, due to inadequate pressure on
the
sensor.
The
VocaLog 2™ Unit
includes a built-in rechargeable battery. A green blinking light near
the USB
port of the VocaLog unit will briefly flash every two seconds when the
battery
power is low, and not plugged in for charging.
Charging
the
The
VocaLog 2™ unit should
be charged prior to first use. We also recommend charging it every
night.
The
VocaLog 2™ unit is
charged through the built-in Micro-USB port through any USB connection
(e.g. a computer,
car adapter, or home charger). An
LED
light will illuminate while the unit is charging and will slowly blink
(once
per second) when charging is complete.
A
fully charged battery will run continuously for up to 3 days depending
on use. Alerts
increase battery drain. Charging
an
empty battery may take up to four hours.
MICROPHONE
The
VocaLog 2™ Calibration
Microphone
The
VocaLog 2™ Vocal
Activity Monitor includes a specially calibrated USB microphone for use
while
calibrating the monitor to the patient.
Please ensure that you have plugged in the microphone and
your computer
settings are enabled for microphone activity. The
first time you run the PC program, you
will be prompted to enter the calibration key located on the front of
the calibration
mic.
Do not
discard this number.
VocaLog
2™ Desktop Application Instructions
The
VocaLog
2™ desktop application is used to manage
patients, calibrate a monitor, update settings, and review collected
data. In
the section below, you will learn how to utilize the main features of
the
program.
Each
time you open the
program you will be presented with the main menu shown below. This is
the
starting point for navigating through the program.
To return to this menu, simply click the Main
Menu button in the top right corner of the screen.
 Use
the Main Menu tabs to navigate the
VocaLog 2™
Desktop Application. Note:
When a
monitor is not detected, only the
option Manage
Patients will appear.
Menu options include:
Use
the Main Menu tabs to navigate the
VocaLog 2™
Desktop Application. Note:
When a
monitor is not detected, only the
option Manage
Patients will appear.
Menu options include:
1.
Add New Patient
2.
Manage Patients
3.
Receive Data
When
selecting “Add New
Patient”, a privacy alert will appear.
This is just to allow you to keep the patient data
private. Click
[Continue]. You
will then be prompted to
enter the patient’s name.
NOTE:
If you have multiple
patients with the same name, i.e. John Smith, you must give each
patient a unique
name or only one record will be created.
From
there, you will be
taken to the Monitor Set-up sub-tab on the Connect to Monitor tab. Three steps are
then clearly displayed:
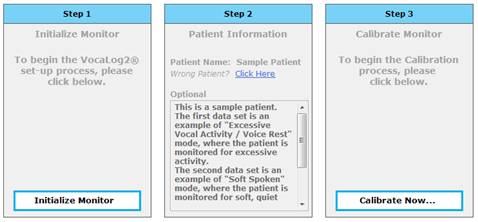
Step
1-
initializes the monitor - The monitor must be initialized in
order to clear the VocaLog
memory
and prepare the
device for calibration.
Step
2
-allows you to enter any relevant notes about the patient
Step
3
- starts the calibration wizard - This will set up the monitor
for use by the new patient.
Note:
Your time and date must be current in
order to ensure accurate data collection.
The
first screen you will
see after clicking [Calibrate Now] is on the Connect to Monitor tab. This tab allows you to
manually select
individual tasks to do with a monitor. At the top of the screen is a drop-down selection
to select which
monitor you will be working with. If you only have one monitor, it
defaults to
that monitor. If you have more than one plugged in, be sure the
appropriate
monitor is selected. The Calibration
Wizard automatically directs you to the
Preparation:
The
Calibration Microphone should be
placed 30cm (11.8") from the
patient. Maintaining a consistent distance will improve accuracy.
Ensuring the
patient is comfortable will help.
On
the VocaLog 2™ Vocal
Activity Monitor, verify the SLEEP switch is turned off (slid away from
SLEEP).
Set the VIBE switch towards VIBE if you want the patient to receive
vibrotactile feedback.
Prior
to launching calibration, ensure you are
in a quiet room with minimal
background noise as this will interfere with the calibration. You
will receive a warning message if the ambient noise is too high.
Process:
Select
the type of patient
you will be working with.
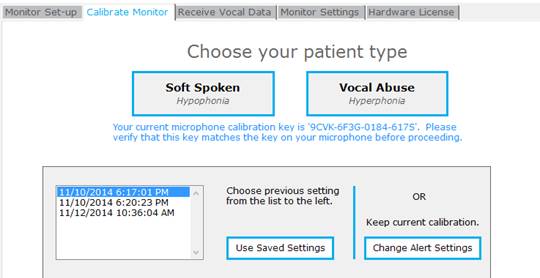
The
button [Change Patient Alert
Settings] skips the calibration process and allows you to jump to the
Calibration Completed step and make adjustments to the patient's alert
levels
without recalibrating the device. This should not be selected for new
patients.
Follow
the on-screen
prompts and instruct your patient to perform each task as it is
displayed. If
you are not satisfied with a task, click Go Back and repeat the task. When possible, tasks
should be started
immediately upon pressing the Start button.
After
the tasks are
completed, select the type of alert you would like your patient to
receive.
Choose
whether you would
like to utilize the Ambient
Noise Compensation.
If you choose to use it, enter the dB appropriate for the patient.
Once
Calibration Wizard
is
complete, optimal settings for the patient will be provided based on
data
collected. You can
modify the alert
settings and fine-tune the VocaLog2 monitor for the patient using the
arrows
next to each setting. For best results, it is recommended to have the
patient
speak at their targeted volume. You will see a real-time visual display
of
their vocal levels at the bottom of the screen.
-For
Hypophonia patients, red
indicates the volume was too low which would result in an alert
to the patient, green
indicates the patient is speaking at or above their targeted
volume.
-For
Hyperphonia patients, Blue
indicates the volume was in the target range (i.e.
"Normal" speech"), and red
indicates the patient is speaking at or above their targeted
volume, which would result in an alert to the patient.

Patient
Alert Setting Descriptions:
Standard
Options:
Minimum
Phonation Volume:
This is the quietest volume that will be detected
as voice or phonation. Any detected sounds quieter than this level will
be
discarded, and not considered phonation.
Targeted
Phonation Volume:
With Hypophonia patients, this is lowest acceptable level
at which they should speak.
With Hyperphonia patients, this is the highest acceptable
level at which they should speak.
Alert
Delay:
This is how long the device waits at a continuously undesired
level before alerting the individual. This is patient specific;
suggested
values are .75-1.00 second(s). Smaller values alert the individual
faster. A
very sensitive individual on voice rest may require a very fast (.25
sec)
alert. Individuals who only speak in brief phonation may also require a
shorter
delay. Too short of a delay will result in excessive alerts, and may
result in a
user ignoring alerts.
Alert
Type: Modify:
This button allows you to go back and modify
the Alert Type settings.
Ambient
Noise Compensation: This may
be turned on or off. This allows the alert levels to vary, depending on
the
ambient noise. The Ambient Noise
Compensation does not adjust the target levels; only the
alert levels. For
instance, a Hypophonia patient may
require a higher alert level in a louder room. This is because a louder
environment
will require an individual to speak louder in order to be heard over
ambient
sounds. However, activating this feature and adjusting this value does
not
change the Targeted Phonation Volume,
so the patient may receive an Alert while within their target.
Note:
Discretion must be used for voice-rest individuals; this feature
may not be beneficial.
Ambient
Noise Compensation dB: This is
the number of dB added to the ambient sound level for alerts. Suggested setting: 0 or 1.
Higher values will
result in an Alert unless the patient is very loud.
Maximum
Phonation Volume: The
ambient noise compensation will not exceed this.
Microphone:
This
is a real-time display
of the microphone dB readings. The green
(or blue)
flag indicates a graphical position of Minimum
Phonation Volume, and the red
flag indicates the Targeted
Phonation Volume. The yellow flag moves with the patient
Sound Pressure
Level (SPL,
in dBC).
Typical
Numbers For Reference:
Minimum Phonation
Volume is typically 50-60dB, and varies between individuals.
Normal Conversation at 1 meter in a quiet room is 60-65dB.
Targeted Phonation
Volume must
be selected by a
clinician, based on the individuals' needs.
Verify
and Fine-Tune Values:
Have
the patient speak
(i.e. read the Rainbow Passage), and observe the Microphone values.
While they
are talking, the meter should nearly always be above the Minimum
Phonation Volume.
The clinician must make the judgment call for appropriate
settings for
each patient. For instance, if a hypophonia individual struggles to
achieve the
target, you may need to reduce the target. Once
you have adjusted the settings to your
satisfaction, click [Save Calibration].
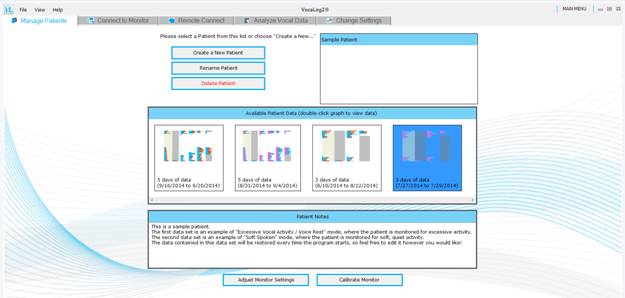
Select
Manage Patients to
be
brought to the
corresponding tab. This function enables you to view your
patient list, rename a patient, delete a patient, view any previously
collected
data-sets, view and modify patient notes, and modify existing settings.
There
are also shortcut buttons to [ Adjust Monitor Settings ] and [
Calibrate
Monitor ]
To
view a patient data
file, select the patient you wish to view and double-click the data set
thumbnail to open the patient’s file.
3.
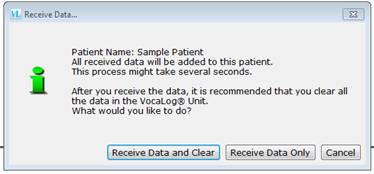
Receive Data
To
download patient data
from the VocaLog2 Monitor, select Receive Data from the Main
Menu. Choose to Receive data and clear the memory,
or Receive
data only. It
is recommended
that you Receive
data only to ensure transfer is successful prior to
deleting the memory. After
data has been
received, the Analyze Vocal Activity page will display the patient
data.
19
Information
coming soon!
The
Analyze Vocal Activity
Page displays either a daily view or a timeline view of collected vocal
activity, and provides options for viewing and analyzing the data. A
summary of
collected data is displayed. For
further
detail on the data, select the Vocal
Activity tab
to see a breakdown of the data.
When
data is selected in a graph,
the Graph Overview area on the
lower
left side of the screen will display a summary that includes all
samples selected.
To make a selection, left click with the mouse and drag over the data
sets to be
analyzed. (See Graph Tools below).
When
the Daily View is selected, the
first
column of data is an Average of All Data. Each subsequent column is an
additional day.
The
following options are displayed on the Vocal Activity Page:
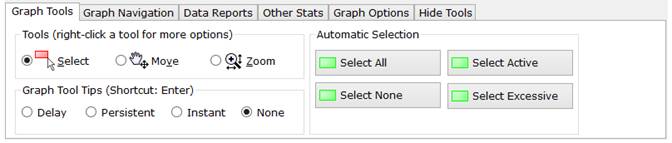
Graph
Tools Sub-Tab:
Select:
(shortcut
S) activates the
user’s mouse as a selection tool. Click and drag on the graph to create
a
selection. Holding
the Ctrl key while
selecting data will allow you to select multiple sections. Additional
Selection Options are available by
right clicking on Select.
Tip:
Each
Selection
option
has a keyboard shortcut for quick access. Use these shortcuts to
facilitate
data selection.
Move
(shortcut
V) allows the
user to move the data in the zoom function. While
zoomed in on a data selection, click the
graph and drag it to the desired location.
The hand tool will grab the data and move it in the
direction indicated
by the mouse.
Zoom
(shortcut
Z) allows the user to zoom in (left
click) and out (right click) on the graph. Additional
zooming options are available by
right-clicking the Zoom tool. Tip: The
Mouse Scroll Wheel can always be used to zoom in and out,
regardless of the tool selected.
Graph
Tool Tips
The
tool tips allow the
user to quickly view the data directly under your mouse.
·
Delay:
Display graph information after a short delay
·
Persistent:
Display graph information regardless of
movement
·
Instant:
Display graph information immediately as your mouse moves
Graph
Options Sub-Tab
This
option allows the user
to change how the collected data is displayed. The
Graph
default option displays normal
and undesired speech levels on the graph. The Legend option displays a
list of colors and the values they represent along with the 0-60 second
timespan than each sample represents.
The
Daily View is helpful for analyzing
trends and patterns. (For
instance, a teacher, who may have spikes at recess.)
2
Graph
Navigation Sub-Tab
The
Thumbnail
View provides
a quick overview of the entire graph. To
display the current view, zoom in on the main graph and a small
rectangle will
display the current view. Use
the mouse
to drag the rectangle to a new location for quickly navigating through
the graph.
The mouse wheel can also be used to zoom in and out.
Zoom
To Selection
Click
the Zoom
to Selection option
to zoom the selected
data to fill the entire graph window.
Zoom
Out
Reduces
the graph so the
entire graph is in view.
Auto
Night Shift / Time
Shifting
It
is possible that a
patient may be vocally active during the hours around midnight. Data may wrap from one
column to the next
making it more difficult to analyze.
The
"Time
Shift Slider Bar” to the
left of the graph adjusts
the start time of
the graph. For example, instead of "12 am to 12 am", display
"9am to 9am" by sliding the "Time
Shift Slider Bar"
up. Alternatively, the "Auto
Night Shift"
button will search the data for a time with no activity. It
will then slide the "Time Shift Slider Bar" to that time, so that the
columns will wrap only when there is no data. Using this feature only
shifts
the starting time of the graph, and does not add or subtract time. This
is
evident when moving the slider, you can see the data move up and down.
21
22
Data
Reports Sub-Tab
The
VocaLog 2™ is designed
to provide quick, easy-to-read data reports from the collected patient
data.
These data reports can be customized and used as a template for
multiple
patients. The following is an overview of the report options:
Choose
a Report Template
The
Standard
Report Templates folder
has two sample report templates to choose from:
The List
Report displays only patient data collected in list form. The Verbal
Report is a narrative style report in paragraph form which
can include
select information from collected data. Both reports can be customized
and stored
for retrieval in the “User-
Created Reports”
folder. These are only samples, and it is
expected that the clinician will tailor them to their specific needs.
3
Customizing
a Report
To
customize a report, click
on “Edit
this Report Template”
at the bottom of the page. This
will take you to the “Customize
Reports”
Sub-Tab in the Change
Settings Tab. Click
Edit
to edit the current report. To edit a different report, locate the
report in
the Choose
a Report Template menu,
select it, and then click the “Edit”
button. Rename the report by changing the text at the top of the
page in the text box. The new report name and report will automatically
be
saved under the User-Created
Reports folder.
Text
that is highlighted BLUE
is referred to as a
Placeholder Field (found at the top of the page).
These placeholders automatically pull
information from the data collected and downloaded.
Placeholders can be added or removed.
Once the report is customized, return to the Analyze
Vocal Activity Tab and
view the User-Created
Report in
the Data
Reports Sub-Tab.
For
more details, see Creating
and Customizing Data Reports.
Other
Stats Sub-Tab
The
Other Stats
sub-tab will
display a date and time each time a function is activated on the
VocaLog 2™
Unit.
24
Activation
Sub-Tab
Enter
the calibration key to register the device.
Display
Sub-Tab
Display
promotional offers
from Griffin Laboratories
Setup
Sub-Tab
Allows
for changes to
select application settings, installs the VocaLog 2™ Docking Station
Drivers
and firmware updates, creates a Desktop Shortcut, and specifies where
the
patient files are stored.
Patient
File Storage
Location
The
Patient File Storage
Location specifies the folder in which the patient files are stored in
the
system's Application Data folder. Storage locations can be changed from
the
Data Application to other locations on the computer.
Customize
Reports Sub-Tab
This
is discussed in detail
in the Creating
and Customizing Data Reports section.
o
Preparation:
Before the
patient arrives:
o
Sizing
should be determined
ahead of time. Most women are size 28; most men are size 35.
o
Ensure
the monitor is fully
charged before the patient arrives. (Up to four hours.) LED blinks once
per
second when fully charged. See Charging
Information.
o
If
the unit is new to the PC, and has not been
activated, the device must be activated.
o
It
is strongly
recommended that you create the New Patient record (either [Add New
Patient] from
the Main Menu, or [Create New Patient] from the Manage Patients tab)
before the
patient arrives in the office. This gives you the opportunity to
initialize the
monitor and clear any prior data to prep the device for the new
patient. See Calibration
Wizard
o
After
the patient arrives:
o
Fit
the monitor to the patient.
o
Calibrate
the monitor to the
patient.
o
Verify
the Patient Alert
settings.
o
From
the Main Menu, click
Receive Data.
o
Select
either "Receive
Data and Clear," or "Receive Data Only," based on your needs. See
Receive Data.
o
If
there is an existing
patient record with the same name as the patient name in the monitor,
the new
data will be entered into that patient record. If there is not a
patient (i.e.
if multiple PC's are used), the patient is automatically created.
o
If
you have not selected
the patient name that corresponds with the monitor, you will see a
warning
before the data is uploaded to allow you to select the correct patient
record.
o
The
Analyze Vocal Activity tab
is automatically
displayed. You may view the chart, and create reports here.
If
a
patient is responding well to the Speech Therapy, a clinician may opt
to modify
the Alert settings.
o
If
you are in the Main
Menu, select Manage Patients, and select the patient.
o
Select
the Connect to
Monitor tab.
o
Select
the Calibrate
Monitor sub-tab.
o
If
you wish to re-calibrate
all over, walk through the Wizard as before. Otherwise, click Change
Patient
Alert Settings.
o
You
should now be at the Review
Settings screen where you can modify the settings. When finished, click
Save
Calibration.
Up
to Contents
Creating and Customizing Data Reports
Overview
The
VocaLog software can
automatically fill in patient statistics into Placeholder Fields in
your
reports. There are template reports for you to customize to your needs;
list
form, and paragraph form. In the editor, the black text is text that
you want
shown and printed verbatim. The Blue
text fields (i.e. {Patient
Name} ) will be replaced by the data and statistics
gathered from the clinicians entries, data, and logging.
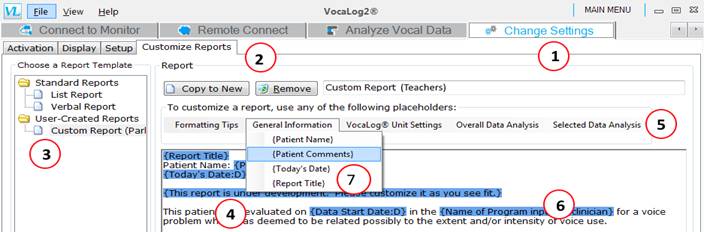
Report
Tab:
In
the top tab, click
Change Settings: (1)
In
the secondary tab, click
Customize Reports: (2)
How
to Edit a report:
o
In
the far left column
titled "Choose a Report Template", click on a report you wish to
edit. (3)
o
If
you selected a template,
click the Edit button.
o
If you wish to create a new
report based on
one you have previously created, click the Copy to New button. Below
(2).
o
If
you are modifying a
Custom Report that has already been created, you will automatically be
in Edit
mode as soon as you click on the Report name in the Report Template
menu. (3)
o
Type
in a new name for the
report. (i.e. "Custom Report (Teachers)")
o
In
the text box, edit the
text just as you would in a standard text editor such as Notepad.
o
When
Note:
Only plain text
format is available. Changes are saved automatically and immediately.
Placeholder
Fields:
Placeholder
Fields are specially
highlighted text that will be replaced by data either entered by the
software
user, or by data gathered from the monitor, when a report is generated.
Placeholder fields are text within braces: {}. The text within the
braces is
descriptive text that describes the data that will replace it. Do not
edit the
text within the braces, or the field may become invalid.
Adding
and Editing Placeholders for Data:
Placeholder
Fields are
added by Clicking the topic (5), and selecting a field from the
drop-down list
(7). The added fields will be highlighted (6), and will be replaced
with data
when viewing the data in the report. (To view a filled in report, see
Patient
Report.)
To
delete a Placeholder
Field, simply highlight it with the mouse and delete it.
Note:
With slower
computers, deleting a placeholder may cause a noticeable delay as the
form
updates.
Up
to Contents
Viewing and Saving Patient Reports
Viewing:
1.
In the top tabs, click
the Analyze Vocal Data tab.
2.
Click the Vocal Activity
Graph tab.
3.
At the bottom, select
Data Reports.
For
the report to be
complete and "Selected Data" Placeholder Fields to be filled in, you
must have some data selected. Use the mouse to highlight the section of
data on
the graph that you want to include in the report. Use the Ctrl key if
you wish
to select multiple sections.
Note:
Any text that is highlighted
is an
invalid placeholder. It is suggested that the report be edited to only
contain
valid placeholders.
Copying
and Saving Reports:
When
modifying reports in
the Edit mode, the changes are automatically saved as they are made.
You may
select text with the mouse, and copy it with Ctrl-C, and paste it into
your
word processor.
You
may also click the Save
Text... button and save the report as a text file.
There
is a button to Edit
This Report Template in the report
editing
tab.
SPL:
Sound
Pressure Level. All measurements with the VocaLog system in dBC.
VocaLog
Calibration Mic:
The external microphone used for calibrating a
monitor to the patient.
VocaLog
Monitor:
The sensor and electronic assembly within the
neckband that monitors the user.
VocaLog
Software:
Refers to the PC
program.
VocaLog
System:
Refers to all of the
the components; the monitor, software, and the calibration mic.
How
do I view the graph?
In
the top tabs, click
Analyze Vocal Data
In
the window below, select
Vocal Activity Graph
How
do I create my own reports?
In
the top tabs, click Change
Settings
In
the window below, select
the tab Customize
Reports.
How
do I enter BOLD text in my
reports?
All
text is plain text at
this time. You may copy and paste the text into a word processor if you
wish to
format the text.
Why
does my report contain
highlighted fields, when I know they are valid?
If
you have Placeholder
Fields for Selected Data in your report, but you do not have any data
selected,
it cannot fill in the data. Select some data in the graph, and the
report will
be completed.
Why
does the monitor vibrate
no matter what?
There
are two explanations
for this. The most common is when Ambient
Noise Compensation
is on, and the Compensation Value is too high. Only use 0 or 1,
unless you are experienced and are familiar with how this works.
If
that is not the case,
then it is advised to recheck the calibration values. Recalibration may
be
required.
What
is SPL?
SPL
= Sound Pressure Level.
In this document, it is measured in dBC.
Will
the VocaLog software work on my Mac?
No.
It requires a Windows
operating system.
Up
to Contents
System Requirements
Windows
PC with Windows
Note:
Windows 8 is not
currently supported. Windows 8 modifies the microphone volume settings
"at
random," and this skews the microphone calibration
2MB
RAM memory, 4 or more
recommended
2GHz
processor minimum
•
Griffin Laboratories
Website: http://www.griffinlab.com
•
Online Tutorials
Available through website
Contact
Us Online:
•
Contact Form:
http://www.griffinlab.com/catalog/contact_us.php
•
VocaLog 2™ Website:
http://www.vocalog.com
Contact
Us by Phone:
•
1-800-330-5969
(8am to 4pm
Pacific Time PST)
•
International Telephone
Number: 1-951-695-6727
Contact
Us by E-mail:
•
Copyright
2014, Griffin
Laboratories, Inc.
VocaLog
is a registered trademark
of Griffin Laboratories, Inc.
VocaLog 2
is a trademark of Griffin Laboratories, Inc.
Specifications
subject to
change without notice.
When
the sunlight strikes
raindrops in the air, they act as a prism and form a rainbow. The
rainbow is a
division of white light into many beautiful colors. These take the
shape of a
long round arch, with its path high above, and its two ends apparently
beyond
the horizon.
There
is, according to
legend, a boiling pot of gold at one end. People look, but no one ever
finds
it. When a man looks for something beyond his reach, his friends say he
is
looking for the pot of gold at the end of the rainbow.
Throughout
the centuries
people have explained the rainbow in various ways. Some have accepted
it as a
miracle without physical explanation. To the Hebrews it was a token
that there
would be no more universal floods. The Greeks used to imagine that it
was a
sign from the gods to foretell war or heavy rain. The Norsemen
considered the
rainbow as a bridge over which the gods passed from earth to their home
in the
sky.
Others
have tried to
explain the phenomenon physically. Aristotle thought that the rainbow
was
caused by reflection of the sun's rays by the rain. Since then
physicists have
found that it is not reflection, but refraction by the raindrops which
causes
the rainbows.
Many
complicated ideas
about the rainbow have been formed. The difference in the rainbow
depends
considerably upon the size of the drops; the width of the colored band
increases as the size of the drops increases. The actual primary
rainbow
observed is said to be the effect of a super-imposition of a number of
bows. If
the red of the second bow falls upon the green of the first, the result
is to
give a bow with an abnormally wide yellow band, since red and green
light when
mixed form yellow. This is a very common type of bow, one showing
mainly red
and yellow, with little or no green or blue.